H5移动端调用浏览器Geolocation方法获取手机gps经纬度方法

具体请看下面代码:

<script>
    var x=document.getElementById("demo");
    function getLocation() {
        if (navigator.geolocation) {
            navigator.geolocation.getCurrentPosition(showPosition,showError);
        } else {
            x.innerHTML="当前浏览器不支持Geolocation";
        }
    }
    function showPosition(position) {
        x.innerHTML="Latitude: " + position.coords.latitude + "<br />Longitude: " + position.coords.longitude;
    }
    function showError(error) {
        switch(error.code) {
            case error.PERMISSION_DENIED:
                alert("User denied the request for Geolocation.")
                break;
            case error.POSITION_UNAVAILABLE:
                alert("Location information is unavailable.")
                break;
            case error.TIMEOUT:
                alert("The request to get user location timed out.")
                break;
            case error.UNKNOWN_ERROR:
                alert("An unknown error occurred.")
                break;
        }
    }
    </script>


在Sublime3中安装使用ESLint,CSSLint

参照原文

1、确保本机安装了node.exe 因为ESLint和CSSLint是调用了node的接口方法;

2、sublime安装SublimeLinter插件,然后安装 SublimeLinter-eslint和 SublimeLinter-csslint;

3、在NPM安装ESLint和CSSLint的包,NPM的是全局安装 ;

npm install -g eslint
npm install -g cssslint


4、打开sublime的 SublimeLinter配置文件path属性配置eslint的CMD文件路径(npm全局安装后会有)

"paths": {
            "linux": [],
            "osx": [],
            "windows": [
                // 这个是你全局安装eslint后eslint.cmd的所在目录
                "C:/Users/Lin/AppData/Roaming/npm/eslint.cmd"
            ]
        },


5、参照原文配置eslint的.eslintrc.json配置文件,或者看官网配置相应的检测rule

configuring

rules

.eslintrc.json文件参考原文的检测规则如下:

.eslintrc.json文件的存放位置可以放在项目的根目录

{
	"env": {
		"browser": true,
		"es6": false,
		"jquery": true,
		"amd": true,
		"node": true
	},
	"parserOptions": {
		"sourceType": "module"
	},
	"rules": {
		"no-cond-assign": [2, "always"], //if, while等条件中不允许使用“=”
		"no-constant-condition": 2,
		"no-debugger": 2, // 程序中不能出现debugger
		"no-dupe-args": 2, // 函数的参数名称不能重复
		"no-dupe-keys": 2, // 对象的属性名称不能重复
		"no-duplicate-case": 2, // switch的case不能重复
		"no-func-assign": 2,
		"no-obj-calls": 2,
		"no-regex-spaces": 2,
		"no-sparse-arrays": 2,
		"no-unexpected-multiline": 2,
		"no-unreachable": 2,
		"use-isnan": 2,
		"valid-typeof": 2,
		"eqeqeq": [2, "always"],
		"no-caller": 2,
		"no-eval": 2,
		"no-redeclare": 2,
		"no-undef": 2,
		"no-unused-vars": 1,
		"no-use-before-define": 2,
		"comma-dangle": [1, "never"],
		"no-const-assign": 2,
		"no-dupe-class-members": 2
	}
}


ie8 及以下不支持 array.map 的解决方式

今天做项目的时候,无意乱用map方法,chrome和firefox支持,但是IE8不支持,网上找了一下有木有解,发现国外有大神写了array.prototype的map扩展

JS源码:

success:function(res){
    $('#busicode').find('.select-loading').text('请选择');
        res.data.map(function(element){
        $('#busicode').append('<option value="'+element.busicode+'">'+element.businame+'</option>');
    });
}

array.prototype.map方法:

// Production steps of ECMA-262, Edition 5, 15.4.4.19
// Reference: http://es5.github.com/#x15.4.4.19
if (!Array.prototype.map) {
    Array.prototype.map = function(callback, thisArg) {

        var T, A, k;

        if (this == null) {
            throw new TypeError(" this is null or not defined");
        }

        // 1. Let O be the result of calling ToObject passing the |this| value as the argument.
        var O = Object(this);

        // 2. Let lenValue be the result of calling the Get internal method of O with the argument "length".
        // 3. Let len be ToUint32(lenValue).
        var len = O.length >>> 0;

        // 4. If IsCallable(callback) is false, throw a TypeError exception.
        // See: http://es5.github.com/#x9.11
        if (typeof callback !== "function") {
            throw new TypeError(callback + " is not a function");
        }

        // 5. If thisArg was supplied, let T be thisArg; else let T be undefined.
        if (thisArg) {
            T = thisArg;
        }

        // 6. Let A be a new array created as if by the expression new Array(len) where Array is
        // the standard built-in constructor with that name and len is the value of len.
        A = new Array(len);

        // 7. Let k be 0
        k = 0;

        // 8. Repeat, while k < len
        while(k < len) {

            var kValue, mappedValue;

            // a. Let Pk be ToString(k).
            //   This is implicit for LHS operands of the in operator
            // b. Let kPresent be the result of calling the HasProperty internal method of O with argument Pk.
            //   This step can be combined with c
            // c. If kPresent is true, then
            if (k in O) {

                // i. Let kValue be the result of calling the Get internal method of O with argument Pk.
                kValue = O[ k ];

                // ii. Let mappedValue be the result of calling the Call internal method of callback
                // with T as the this value and argument list containing kValue, k, and O.
                mappedValue = callback.call(T, kValue, k, O);

                // iii. Call the DefineOwnProperty internal method of A with arguments
                // Pk, Property Descriptor {Value: mappedValue, : true, Enumerable: true, Configurable: true},
                // and false.

                // In browsers that support Object.defineProperty, use the following:
                // Object.defineProperty(A, Pk, { value: mappedValue, writable: true, enumerable: true, configurable: true });

                // For best browser support, use the following:
                A[ k ] = mappedValue;
            }
            // d. Increase k by 1.
            k++;
        }

        // 9. return A
        return A;
    };
}

参考来源:GO >>


Firefox火狐浏览器web开发调试开启强制刷新缓存模式

最近做项目的时候,在火狐浏览器发现缓存难清理,用Ctrl+F5 Ctrl+R 等在谷歌和IE浏览器的快捷键没用,搜索了一下,发现火狐清理缓存比较麻烦,默认快捷键 Ctrl + Shift + Del 键是弹窗选择性清理,还要点击按钮选择,在web开发调试中非常的不方便,也不科学。
然后问度娘后发现火狐是要进入它的参数设置里设置本地不缓存的:

火狐浏览器地址栏输入:about:config
1.找到browser.cache.check_doc_frequency选项,双击将3改成1
2.找到browser.cache.disk.enable 把true改为 false
3.找到browser.cache.memory.enable 把true改为 false

webpack学习教程使用的插件记录

  1. html-webpack-plugin

作用:自动快速的帮我们生成HTML

config文件用法:

plugins: [
    new HtmlwebpackPlugin({
      title: 'Hello World app'
    })
  ]

2. webpack-dev-server

作用:新建一个开发服务器,可以serve我们pack以后的代码,并且当代码更新的时候自动刷新浏览器。

config文件用法:

devServer: {
    historyApiFallback: true,
    hot: true,
    inline: true,
    progress: true,
  },

webpack使用loader的方式来处理各种各样的资源

//样式处理loader
css-loader
style-loader
sass-loader

//图片和其他静态文件的处理loader
url-loader

//添加ES6的支持
babel-loader
babel-preset-es2015

//检测JS规范
jshint-loader

//JQ插件或者古老的库引入
imports-loader


win10安装webpack问题

最近开始接触webpack,用win10来安装出现了环境变量的问题。具体情况如下:运行webpack命令的时候,CMD出现:

Cannot find module 'webpack/lib/node/NodeTemplatePlugin'

搜索一番后发现原来是windows的环境变量没设置好,可能和我用的用户不是超级用户有关系,后面把环境变量补上去,关掉cmd重新打开就可以运行指令了。

pic1

pic2

具体步骤:

解决方法是:

配置环境变量,指定webpack/lib/node/NodeTemplatePlugin的准确路径;

1.右键我的电脑点击属性,弹出以”系统“为标题的窗口;

2.点击左侧高级系统,弹出系统属性窗口;

3.点击环境变量,弹出环境变量窗口;

4.

    4.1如果你的webpack是是用cnpm安装的,则在dos下执行cnpm config get prefix,然后会在界面输出一个路径;我的是F:\Program Files\nodejs

然后在第3步弹出的环境变量窗口中 系统变量里新建变量NODE_PATH,值为:以第4步得到的路径开头,F:\Program Files\nodejs\node_modules;然后一直点击确定;

    4.2如果你的webpack是是用npm安装的,则在dos下执行npm config get prefix;后续步骤同4.1所述;

5.关闭dos窗口,再次打开dos;就好了;

参照这篇文章:webpack问题

npm failed to fetch from registry解决方法:

最近在win10上面安装了webpack,但是出现下面情况:

QQ图片20160326171102

上网找了一下解决方案:

就是把HTTPS改成了HTTP

npm config set registry http://registry.npmjs.org/

原生JS快速获取和更改标签里面的属性值

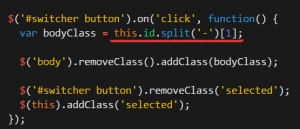
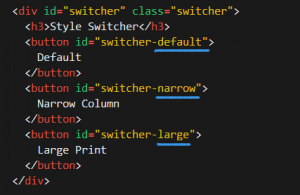
今天看代码的时候遇到一个原生JS的知识点,下图的

code1  code2

this.id.split('-')[1]

/* 
这里的this是点击那个<button></button>整个对象代码
假设点击了第一个default的<button>
this.id = "switcher-default"
this.id.split('-') = [switcher,default]
this.id.split('-')[1] = "default"
*/

原生javascript扩展知识:

getAttribute:取得属性;
setAttribute:设置属性;

a[0].id
//"header"
a[0].className
//"Xman"
a[0].getAttribute('attrName');
//获取attrName的值,例如 title、style、data-XX等
a[0].setAttribute('attrName','value');
/*
设置attrName的值,在value处输入对应的值,这个value是直接覆盖原来的值,如果你设置了style,如果里面已经有一个样式了,你要加个背景就要在原有的值上加上背景的样式。
例:font-size:16px; 增加背景:font-size:16px; background:#ccccccc;
*/


console.log

code3

win7下初探nodejs


安装环境:Win7 32/bit

安装包:https://nodejs.org/en/download/

node版本:Windows Installer (.msi) 5.0


知识点

1、不要用默认的c:\program Files\ 因为这样在命令行操作要输入的很长中间还有空格,我把安装目录放在 X:\node (x:任意盘符)

2、npm install -g express 最好在cmd 命令行里cd 到相应的 x:\node 目录下执行,命令里面的 -g 是全局global的意思:


npm的包安装分为本地安装(local)、全局安装(global)两种,从敲的命令行来看,差别只是有没有-g而已,比如:
代码如下:复制代码
npm install grunt # 本地安装
npm install -g grunt-cli # 全局安装
下面分别解释。
1. npm install xxx -g 时, 模块将被下载安装到【全局目录】中。
【全局目录】通过 npm config set prefix “目录路径” 来设置。
通过 npm config get prefix 来获取当前设置的目录。
2. npm install xxx ,则是将模块下载到当前命令行所在目录。
例如:
代码如下:复制代码
c:\123>npm install xxx
将会安装到
代码如下:复制代码
c:\123\node_modules\xxx
这种方式显然是不好的,所以一般都会使用全局安装方式统一安装的一个目录中去,这样既方便管理、结构清晰还可以重复利用。


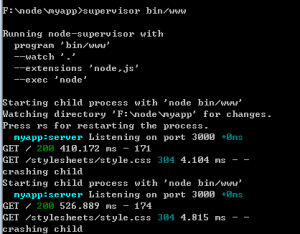
3、页面做了修改不用刷新:supervisor app.js 失效,因为node 新版的 npm start 是在 bin/www ,所以直接 supervisor bin/www 就成功了!

QQ图片20151114160328